Tree Roots

THE OVERVIEW

Employing screw piles for solar panel installation represents a contemporary and efficient technique within the field of foundation repair. It focuses on reinforcing and securing buildings encountering issues like subsidence, instability, or ground settlement. This method proves particularly valuable when traditional approaches risk causing excessive damage to the surrounding area, disrupting occupants, or proving ineffective due to unique site conditions or soil characteristics.
The process of integrating screw piles into solar panel projects is comprehensive and entails a series of well-defined steps, each crucial to the success of the foundation stabilization endeavor. Initially, a thorough assessment of the foundation and surrounding soil is conducted to ascertain the extent of damage and underlying causes.
Screw piles are particularly advantageous for solar panel installations due to their quick installation, minimal environmental impact, and the ability to be removed and reused. This foundation method is adaptable to a wide range of soil types and is ideal for sites where traditional concrete foundations are not feasible or desired.

THE PROCESS

Site Assessment
Initial evaluation includes analyzing soil type, ground conditions, and checking for underground utilities. Orientation and angle of solar panels for optimal sun exposure are also considered.
Design and Engineering
Engineers design the screw pile foundation based on the site assessment and solar panel system requirements, selecting appropriate length, diameter, and number of helices on each pile.
Choosing the Right Equipment
Installation requires specialized equipment like a hydraulic drive motor attached to skid-steers or excavators, chosen based on site accessibility and screw pile size.
Installation Process
Screw piles are rotated into the ground using the installation equipment, with careful monitoring to ensure correct depth and angles.
Achieving Required Torque
Torque applied during installation is monitored to ensure each pile is securely anchored and capable of supporting the designated loads.
Attaching the Solar Panels
Mounting hardware and frames are attached to the pile heads to support the solar panels at the optimal angle for energy production.
Final Assembly
Solar panels are mounted, connected, and secured, with the entire assembly checked for stability and alignment to ensure efficiency and durability.

THE PROCESS

Site Assessment
Before installation begins, a thorough assessment of the site is conducted. This includes analyzing soil type, density, moisture content, and other geotechnical factors that influence the choice and design of the screwpiles. The layout of the solar panel array is also planned during this phase.
Design of Screwpiles
Based on the site assessment, screwpiles are designed to meet the specific load requirements of the solar panels. This includes determining the length, diameter, and the type of helix  needed to achieve the required bearing capacity.
Marking the Installation Points
The exact locations where the screwpiles will be installed are marked according to the layout plan of the solar panel array. This ensures precise alignment of the panels for optimal solar exposure.
Installation of Screwpiles
Screwpiles are installed using a rotating motion, which is typically done using hydraulic machinery equipped with a torque motor that can handle the pile’s size and the required depth. For restricted access projects we have our handheld devices. 
Depth and Torque Monitoring
Throughout the installation process, the depth and torque are closely monitored to ensure that each screwpile is installed to the correct depth and with sufficient torque. This ensures that the piles have a strong and stable foundation capable of supporting the solar panels.
Attachment of Mounting Hardware
Once the screwpiles are in place, mounting hardware is attached to the top of each pile. This hardware provides the structural support for the solar panels and allows for the attachment of the panels to the pile foundation.
Installation of Solar Panels
With the foundation and support structure in place, solar panels can be mounted onto the hardware and secured in place 
Final Inspection and Testing
After the solar panels are installed, a final inspection is conducted to ensure that everything has been installed correctly and is functioning properly.

Projects with Solar Panels

29 Beaucroft Lane, Wimborne

The Wimborne residential project, featuring a garage extension, concluded remarkably ahead of time in just 2 days instead of the planned week, resulting in a 56m² double garage. Utilising an 8-ton Kubota x60 Excavator and 17 screwpiles with a 5m average depth, this efficient completion was achieved in collaboration with MPS Building LTD.

Read More »

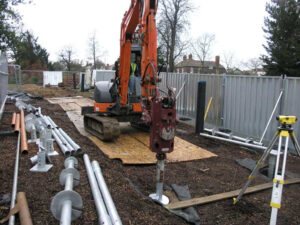
22 Crichel Mount, Sandbanks

In our recent residential extension project, 22 screwpiles were installed to strategically enhance the existing garage and terrace area. Executed by the dedicated team at Screwpiling UK for MPS Building Contractors, the renovation achieved an average depth of 6 meters for each 76mm diameter screwpile within a remarkable 1-week timeframe, surpassing expectations. The project utilized our 8-ton Kubota excavator, demonstrating efficiency and excellence in execution.
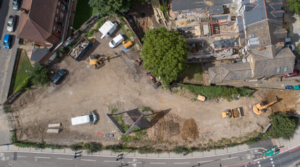
Read More »

Rosebank Way, Acton

Nestled in North Acton, West London, within the London Borough of Ealing, Rosebank Way is at the heart of a dynamic revitalization, fuelled by the upcoming Elizabeth Line (Crossrail) from Acton Main Line. Serving as a catalyst for ongoing investment, the transit project is set to boost connectivity and has the potential to elevate property values and spur economic activity.

Read More »

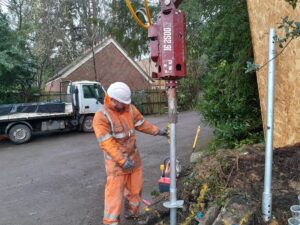
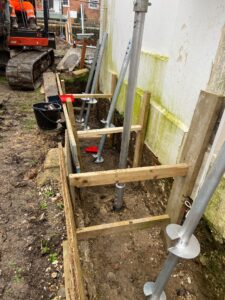
4 St James’ Villas, Winchester

Our recent residential extension project highlights our dedication to quality and efficiency. Despite challenges posed by restricted access, our specialized equipment, including the 65kg 700H Handheld Torque, enabled us to install 22 screwpiles at an impressive average depth of 6 meters.

Read More »

CONTACT US